2 How to use this book
The tutorials in this book are designed in a way for you to follow along easily. We will describe four different options:
- Work on your local machine
- With R Studio ← This is what we recommend for most users
- with a different IDE
- Work in the Cloud (via your browser)
- ZHAW’s RStudio Cloud ← Only available for ZHAW Students and Teachers1
- RStudio’s RStudio Cloud
1: Login with your School Credentials. Contact Nils to apply for an account
Here is a quick overview of the steps necessary and the features available depending on which path you choose. We will explain these steps in more detail below:
| on your local machine | in the cloud | |||
|---|---|---|---|---|
| Step | a RStudio | b different IDE | c ZHAW's Cloud | d Rstudio Cloud |
| 1. Download and install R | CRAN | this step is not necessary | ||
| 2. Download and install IDE | RStudio | from the IDEs website | this step is not necessary | |
| 3. Install the accompanying R Package "arc2r" | install_github("arc2r/arc2r") | this step is not necessary | install_github("arc2r/arc2r") | |
| 4. Create a new Project using the Templates | see Details below | this feature is not available | see Details below | this feature is not available |
Step 1: Installing R
To follow along, you will need a fairly new version of R, which you can download from CRAN. See Appendix B to find out the R and Package Version that we used.
Step 2: Installing RStudio
To interact with R, using a good IDE is very helpful. We use RStudio ourselves (which you can download for free here) but you are free to use your preferred software.
Step 3: Install the accompanying package arc2r
This book has an accompanying package that will provide you with all the necessary datasets. Plus, installing this package in the right way (dependencies = TRUE) will also provide you with all the necessary packages, so you don’t have to install them manually.
Since the package is hosted on github and is not available on CRAN, you cannot install it the usual way (install.packages("arc2r")). Instead, you will have to install it using the remotes packages, which is on CRAN. This package will provide you with a function named install_github(), which allows installing packages from github. Note: Since the package contains all the datasets, this might take a while. You might get promted to upgrade your R packages: We recommend you do so. If you are afraid of messing up dependencies in other projects, cosider working with renv.
install.packages("remotes")

remotes::install_github("arc2r/arc2r", dependencies = TRUE)
Step 4: Create a new project
If you are working with RStudio, you can make use of the RMarkdown Template that we provide you with the data package you installed in the last step. To use these, restart RStudio and create a new project (File > New Project). Choose “New Directory” and in the next window, click on the the template we created for following along (see figure 2.1).
Note that this feature is not available if you are using a different IDE than RStudio or if you are working on RStudio Cloud.
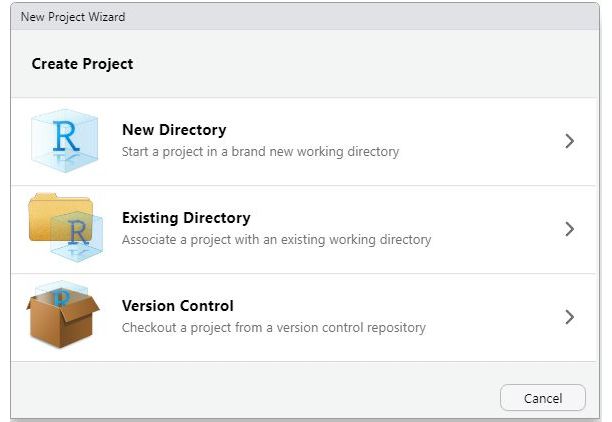
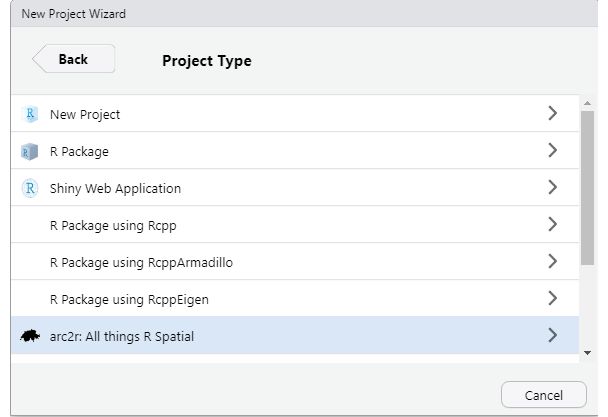
Figure 2.1: To use the templates, click on ‘Create project’ and then on ‘arc2r: all things R Spatial’
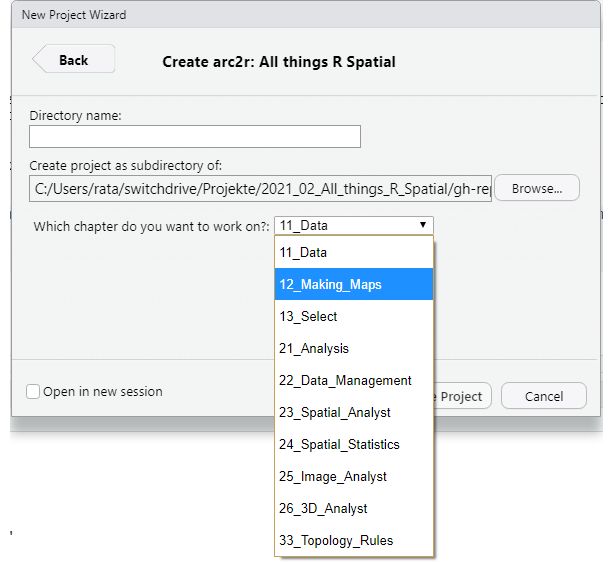
Figure 2.2: Now you can choose a chapter to work on